
 Picture: Cydia running on iOS 4.3.5, iPhone 4 (GSM)
To perform iOS 4.3.5 tethered jailbreak using PwnageTool v4.3.5, you have to download the following files:
Important Note: There is currently no unlock for iPhone 4 on 4.10.01 baseband of iOS 4.3.5. If you are care of software carrier unlock, do NOT update to the stock 4.3.5 from iTunes.
Picture: Cydia running on iOS 4.3.5, iPhone 4 (GSM)
To perform iOS 4.3.5 tethered jailbreak using PwnageTool v4.3.5, you have to download the following files:
Important Note: There is currently no unlock for iPhone 4 on 4.10.01 baseband of iOS 4.3.5. If you are care of software carrier unlock, do NOT update to the stock 4.3.5 from iTunes.
How to Modify PwnageTool For Custom Bundle
Step 1: extract the custom bundle we mentioned above and drag it to your desktop. Step 2: drag the PwnageTool app to the /Applications folder but do not launch it yet. Instead, right-click it and select Show Package Contents, in order to insert the bundle. For reference, check out the screenshot below.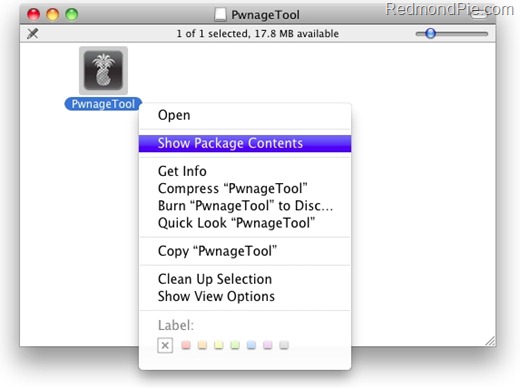 Step 3: you should now see a Finder window identical to the one below. Navigate over to Contents/Resources/FirmwareBundles/ and place the .bundle file you had selected earlier to this location, then close the window.

Creating Custom 4.3.5 Firmware
Step 4: start up PwnageTool in Expert mode, as shown on the screenshot below. Select the device you’re using, then click on the blue arrow on the bottom-right corner of the window to proceed.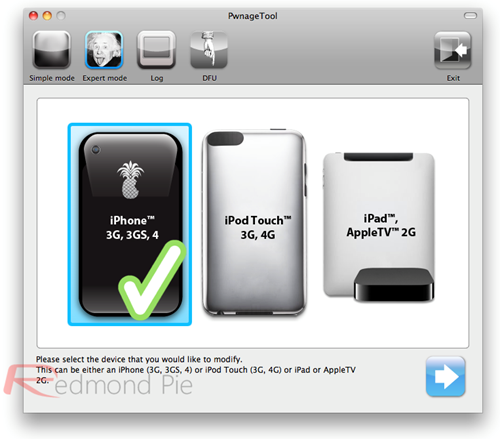 Step 5: when requested, point PwnageTool to the iOS 4.3.5 IPSW file you downloaded earlier, as shown in the screenshot below.
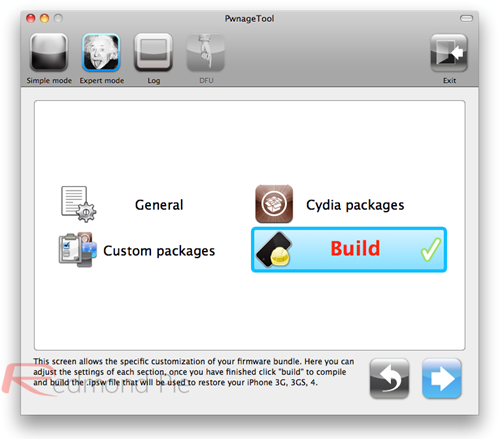
 Step 6: on the next screen, you’ll be given the option to further customize the software you’re about to build. Feel free to toy around with these settings, but only if you know what you’re doing. If you’re not sure what to do, just click on "Build" as shown below. PwnageTool will then build a jailbroken firmware, a process that could take a few minutes, so kick back and have a soda.
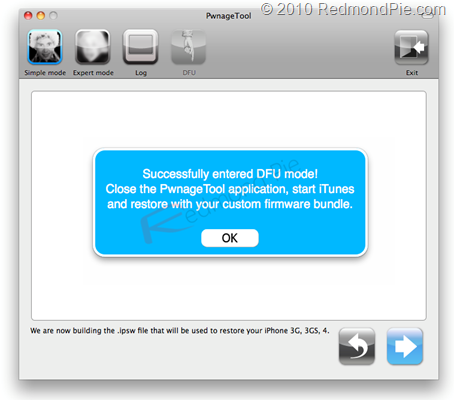
 Step 7: when instructed, you need to put your phone into DFU mode. Just do as follows:
Hold down both the Power and Home buttons simultaneously for 10 seconds. Release the Power button but keep holding the Home button for 10 more seconds. If your screen is black, you’re in DFU mode. If an iTunes logo is displayed, you’re in Restore Mode: just try the steps above a few more times, sometimes it doesn’t go well on the first try. Nonetheless, a notification will be displayed if you’ve managed to enter this mode correctly.
Step 7: when instructed, you need to put your phone into DFU mode. Just do as follows:
Hold down both the Power and Home buttons simultaneously for 10 seconds. Release the Power button but keep holding the Home button for 10 more seconds. If your screen is black, you’re in DFU mode. If an iTunes logo is displayed, you’re in Restore Mode: just try the steps above a few more times, sometimes it doesn’t go well on the first try. Nonetheless, a notification will be displayed if you’ve managed to enter this mode correctly.
Restoring Custom iOS 4.3.5 Firmware On iPhone 4
Step 8: once this process is done, you’re free to exit out of PwnageTool. Now launch iTunes and restore to the firmware file you’ve just created: select your device from the iTunes sidebar, and click Restore while holding down the Alt key on your keyboard. Select the firmware file you’ve just saved (make sure it’s the one created by PwnageTool, not the default firmware) and click Open. iTunes should now begin loading the jailbroken firmware to your device, avoid interacting it at this point. If everything goes as expecting, your device should be jailbroken at this point.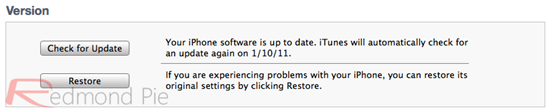
Booting iPhone In Tethered Mode
Since this is a tethered jailbreak, whenever you boot up your device you’ll have to plug it into your computer and run a small utility known as tetheredboot. You’ll need to follow the following Step 11 and Step 12 whenever you start up your device! Step 9: place tetheredboot (download link at the beginning of the article) in an accessible directory. Step 10: change the extension of the custom IPSW file you’ve just created to .zip by renaming the file, then extract it much like a real ZIP file. Navigate to /Firmware/dfu/ and copy two files (kernelcache.release.n90 and iBSS.n90ap.RELEASE.dfu) from that directory to the folder you’ve pasted tetheredboot utility into, as shown below.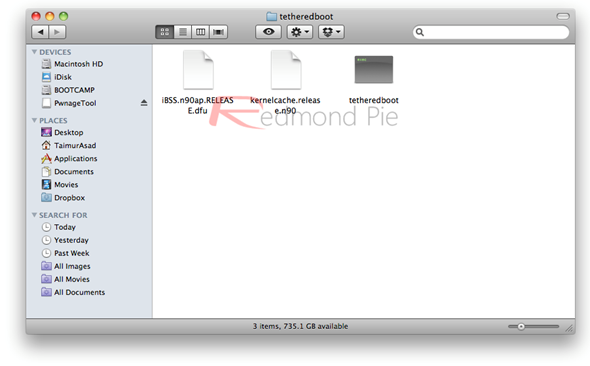 Step 11: with your device plugged in but turned off, bring up the Mac OS X Terminal (by heading to Applications/Utilities/Terminal), type in the following commend, press enter and insert your password when requested:
sudo -sThen type in the following:
/Users/TaimurAsad/Desktop/tetheredboot/tetheredboot /Users/TaimurAsad/Desktop/tetheredboot/iBSS.n90ap.RELEASE.dfu /Users/TaimurAsad/Desktop/tetheredboot/kernelcache.release.n90if the commands above don’t work, try the following:
/Users/TaimurAsad/Desktop/tetheredboot/tetheredboot –i /Users/TaimurAsad/Desktop/tetheredboot/iBSS.n90ap.RELEASE.dfu -k /Users/TaimurAsad/Desktop/tetheredboot/kernelcache.release.n90Important: Make sure you replace /Users/TaimurAsad/Desktop/tetheredboot/ with the directory where you have placed the tetheredboot utility. If you’re not comfortable typing in commands, you can simply drag the 3 files in your tetheredboot folder right into the terminal window after the original sudo -s command. Step 12: after some code runs through the terminal, you’ll be asked to set your phone into DFU mode. Do so, as shown below: Hold down both the Power and Home buttons simultaneously for 10 seconds. Release the Power button but keep holding the Home button for 10 more seconds. If your screen is black, you’re in DFU mode. If an iTunes logo is displayed, you’re in Restore Mode: just try the steps above a few more times, sometimes it doesn’t go well on the first try. If you wait a few seconds, you should see “Exiting libpois0n” on the terminal. Your device is now in a jailbroken state until next time you power off.
Recent Blog
Ultimate Guide: How to turn Off Restricted Mode on iPhone?

Automate Apple GSX check result obtaining?
iRemove Unlock iPhone 5S, 5C, 5, SE, 4S/4 Software

MacOS High Sierra Features: Set Up Websites in Safari on Mac
How to Enable iOS 11 Mail Reply Notification on iPhone 7

How to Bypass Apple Watch Passcode Problem
LetsUnlock Services List
iPhone & iPad Activation Lock Bypass
Use LetsUnlock iCloud Tool to bypass Activation Lock Screen on iPhone and iPad running on iOS version up to 14.6.
Read More
Unlock Passcode Disabled iPhone or iPad
LetsUnlock iCloud Tool is ready to remove Find My and unlock your passcode disable device running on iOS 13.x.x in one click!
Read More
MacOS iCloud Activation Lock Bypass
The LetsUnlock Mac iCloud Activation Lock Bypass Tool will help you to remove Activation Lock on an iCloud locked Mac which is stuck on Activation Lock Screen with no need to enter the correct Apple ID and password.
Read More
Mac EFI Firmware Passcode Bypass
The LetsUnlock EFI Bypass Tool is a one button solution, which you click to start the EFI Unlock process. Bypass EFI with out password! Everything else does the software.
Read More
MacOS iCloud System PIN Bypass
The LetsUnlock MacOS iCloud System PIN Bypass Tool was designed to bypass iCloud PIN lock on macOS without passcode!
Read More